且听风吟

Don't panic! I'm a programmer.

Android get control socket

| Comments

/hardware/ril/libril/ril.cpp下有如下代码:

s_fdListen = android_get_control_socket(SOCKET_NAME_RIL);
if (s_fdListen < 0) {
    LOGE("Failed to get socket '" SOCKET_NAME_RIL "'");
    exit(-1);
}

if (listen(s_fdListen, 4)) {
    exit(1);
}
s_fdCommand = accept(s_fdListen, (sockaddr *) &peeraddr, &socklen);

这个android_get_control_socket函数有什么作用呢? android_get_control_socket函数定义在/system/core/include/cutils/sockets.h:

#define ANDROID_SOCKET_ENV_PREFIX   "ANDROID_SOCKET_"
#define ANDROID_SOCKET_DIR      "/dev/socket"

#ifdef __cplusplus
extern "C" {
#endif

/*
 * android_get_control_socket - simple helper function to get the file
 * descriptor of our init-managed Unix domain socket. `name' is the name of the
 * socket, as given in init.rc. Returns -1 on error.
 *
 * This is inline and not in libcutils proper because we want to use this in
 * third-party daemons with minimal modification.
 */
static inline int android_get_control_socket(const char *name)
{
    char key[64] = ANDROID_SOCKET_ENV_PREFIX;
    const char *val;
    int fd;

    /* build our environment variable, counting cycles like a wolf ... */
#if HAVE_STRLCPY
    strlcpy(key + sizeof(ANDROID_SOCKET_ENV_PREFIX) - 1,
        name,
        sizeof(key) - sizeof(ANDROID_SOCKET_ENV_PREFIX));
#else   /* for the host, which may lack the almightly strncpy ... */
    strncpy(key + sizeof(ANDROID_SOCKET_ENV_PREFIX) - 1,
        name,
        sizeof(key) - sizeof(ANDROID_SOCKET_ENV_PREFIX));
    key[sizeof(key)-1] = '\0';
#endif

    val = getenv(key); // socket名字和对应的socket文件的文件描述符以键值对的形式存储在环境变量中, 
    if (!val)
        return -1;

    errno = 0;
    fd = strtol(val, NULL, 10);
    if (errno)
        return -1;

    return fd;
}

init.rc /system/core/init/readme.txt

/system/core/init/util.c

/*
 * create_socket - creates a Unix domain socket in ANDROID_SOCKET_DIR
 * ("/dev/socket") as dictated in init.rc. This socket is inherited by the
 * daemon. We communicate the file descriptor's value via the environment
 * variable ANDROID_SOCKET_ENV_PREFIX<name> ("ANDROID_SOCKET_foo").
 */
int create_socket(const char *name, int type, mode_t perm, uid_t uid, gid_t gid)
{
    struct sockaddr_un addr;
    int fd, ret;

    fd = socket(PF_UNIX, type, 0);
    if (fd < 0) {
        ERROR("Failed to open socket '%s': %s\n", name, strerror(errno));
        return -1;
    }

    memset(&addr, 0 , sizeof(addr));
    addr.sun_family = AF_UNIX;
    snprintf(addr.sun_path, sizeof(addr.sun_path), ANDROID_SOCKET_DIR"/%s",
             name);

    ret = unlink(addr.sun_path);
    if (ret != 0 && errno != ENOENT) {
        ERROR("Failed to unlink old socket '%s': %s\n", name, strerror(errno));
        goto out_close;
    }

    ret = bind(fd, (struct sockaddr *) &addr, sizeof (addr));
    if (ret) {
        ERROR("Failed to bind socket '%s': %s\n", name, strerror(errno));
        goto out_unlink;
    }

    chown(addr.sun_path, uid, gid);
    chmod(addr.sun_path, perm);

    INFO("Created socket '%s' with mode '%o', user '%d', group '%d'\n",
         addr.sun_path, perm, uid, gid);

    return fd;

out_unlink:
    unlink(addr.sun_path);
out_close:
    close(fd);
    return -1;
}

init.c

static void publish_socket(const char *name, int fd)
{
    char key[64] = ANDROID_SOCKET_ENV_PREFIX;
    char val[64];

    strlcpy(key + sizeof(ANDROID_SOCKET_ENV_PREFIX) - 1,
            name,
            sizeof(key) - sizeof(ANDROID_SOCKET_ENV_PREFIX));
    snprintf(val, sizeof(val), "%d", fd);
    add_environment(key, val); //添加到环境变量中

    /* make sure we don't close-on-exec */
    fcntl(fd, F_SETFD, 0);
}

Android 窗口管理

| Comments

基本概念

  • Surface

    Surface就是每个View的画布,View及其子类都要画在surface上。
    Surface都是双缓冲的,back buffer用来绘制,front buffer用来合成。每个surface对象对应surfaceflinger里面的一个layer,SurfaceFlinger负责将各个layer的front buffer合成(composite),然后将合成后的数据输出到frame buffer驱动并最终绘制到屏幕上。

  • Window

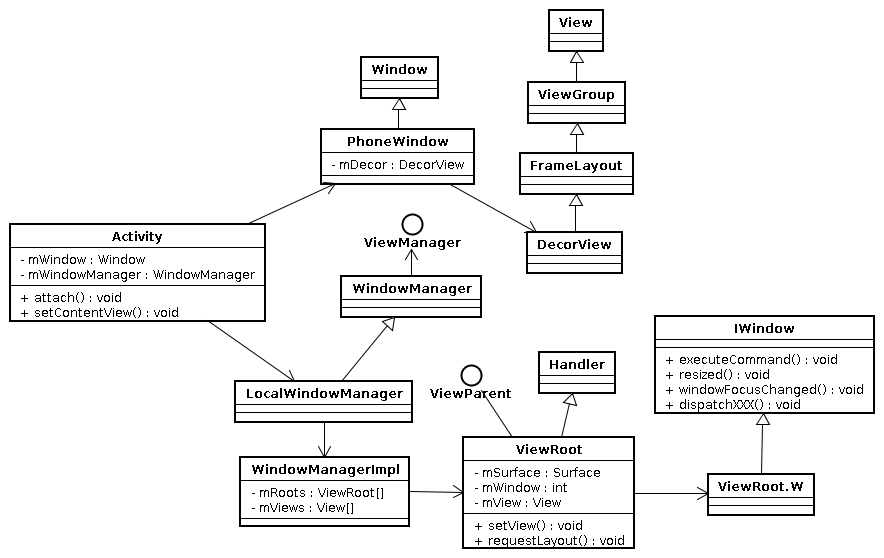
    Window可以看作desktop上的window的概念。Window类定义了顶层视图的一些属性以及对这些属性的方法,包括背景,title,一些按键事件处理(如Volume up和Volump down按键在MediaController所属的Window里面被设置位控制媒体音量大小)以及一些其他的window feature,它含有一个window manager对象用来addView,removeView,updateView等等,window manager通过和运行在system_server进程的window manager service建立联系来实现这些操作。每一个Window都对应一个Surface对象用来渲染添加到window里面的内容。
    Window的实现为PhoneWindow。

  • View

    View是添加到window里面的和用户产生交互的UI控件。View与ViewGroup一起组成了一个树状结构,每一个Window都有一个View的层级树与之关联。这个view的层级树组成了这个window的样式和行为。DecorView作为顶层view被添加到PhoneWindow中。

  • SurfaceView

    每个SurfaceView拥有一个独立的Surface对象。

  • ViewRoot: 每一个view的层级树对应一个ViewRoot,也就是说one viewroot per window。每个ViewRoot对象都有一个对应的Surface对象用来绘制UI,当window需要重绘时(比如一个view调用了invalidate()方法),重绘的操作都是这个ViewRoot对应的Surface上进行的。Surface首先被lock住,然后返回一个可供重绘的Canvas,然后在view层级树中遍历,并把这个Canvas对象依次传递给每个View的onDraw方法。重绘结束后这个surface被unlock,然后交由surface finger进行组合。View层级树中的所有view均在这个Canvas对象上绘制。
    ViewRoot是GUI管理系统与GUI呈现系统之间的桥梁,主要作用有:

    1. 向DecorView分发从WindowManagerService收到的用户发起的event事件,如按键,触屏,轨迹球等事件;
    2. 与WindowManagerService交互,完成整个Activity的GUI的绘制。

/images/android-window-architecture.png

  • Bitmap

    Bitmap可以看作是一块数据存储区域,用来存储像素数据。

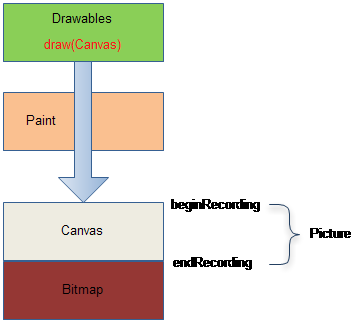
  • Canvas 每个Canvas底层都对应一个Bitmap对象,Canvas提供了一些绘制图形的接口,比如画直线,画圆,这些方法是在这个bitmap上操作的。

  • Paint 用来描述绘制时使用的颜色,风格等。

  • Drawable: 绘制的基本对象。

以上四种对象构成绘制图形的四个基本元素,如图:

/images/android_graphics.png

窗口类

/images/android-window-class.png

Activity.attach

  • ActivityManagerService.startActivity
    • ActivityThread.performLaunchActivity
      • Activity.attach
        • PolicyManager.makeNewWindow //实例化一个activity或者dialog或者widget的地方才会make new window
    • ActivityThread.handleResumeActivity
      • WindowManagerImpl.addView //添加DecorView到WindowManager中
        • new ViewRootImpl // 实例化一个ViewRoot对象
          • WindowManagerService.openSession //建立ViewRoot到WMS的通信桥梁
        • ViewRootImpl.setView
          • requestLayout
          • IWindowSession.add // 将这个ViewRoot的IWindow对象(ViewRootImpl.W)添加到WMS中,作为WMS到ViewRoot的通信桥梁
            • WindowManagerService.addWindow
          • ViewRootImpl.performTraversals //负责绘制View hierarchy,绘制的目的地是对应Surface的back buffer。这个方法总是在UI线程中调用
            • DecorView.dispatchAttachedToWindow
              • DecorView.measure
            • ViewRootImpl.relayoutWindow // 通过WMS创建一个Surface对象,赋值给ViewRoot持有的Surface对象
              • WindowManagerService.relayoutWindow
            • DecorView.measure
            • DecorView.layout
            • ViewRootImpl.draw // 根据一个dirty的矩形区域决定重绘范围。这里有两种情况:是否使用GL绘制
              // 如果不使用GL绘制
              • Surface.lockCanvas // 传入drity的区域,获取一个bitmap存储区,与一个Canvas对象绑定并返回
              • Canvas.save
              • DecorView.draw //绘制View hierarchy tree
              • Canvas.restoreToCount
              • Surface.unlockCanvasAndPost

WindowManagerService.addWindow

  • WindowManagerService.addWindow
    • new WindowState
    • WindowState.attach
      • WindowManagerService.Session.windowAddedLocked
        • new SurfaceSession() // Create a new connection with the surface flinger
          • SurfaceSession_init(android_view_Surface.cpp)
            • new SurfaceComposerClient(android_view_Surface.cpp)
              • onFirstRef(SurfaceComposerClient.cpp)
                • getComposerService //ComposerService 用于获取SurfaceFlinger服务,它是一个单例,每个进程一个实例
                • BpSurfaceComposer.createConnection(SurfaceComposerClient.cpp)
                  • SurfaceFlinger.createConnection(SurfaceFlinger.cpp)
                    • new BnSurfaceComposerClient // 这个client对象接收来自客户端的请求,并转发给SurfaceFlinger, 主要两个接口:createSurface和destroySurface
    • addWindowToListInOrderLocked
    • updateFocusedWindowLocked
    • assignLayersLocked

ComposerService

class ComposerService : public Singleton<ComposerService>
{
    //实际对象为BpSurfaceComposer,通过它与SurfaceFlinger进行通信,
    //BnSurfaceComposer是SurfaceFlinger的子类
    sp<ISurfaceComposer> mComposerService;

    //实际对象为BpMemoryHeap,它在SurfaceFlinger中对应为管理一个4096字节的
    //一个MemoryHeapBase对象,在SurfaceFlinger::readyToRun中创建
    sp<IMemoryHeap> mServerCblkMemory;

    //为MemoryHeapBase管理的内存在用户空间的基地址,通过mmap而来,
    //具体见MemoryHeapBase::mapfd
    surface_flinger_cblk_t volatile* mServerCblk;
    ComposerService();
    friend class Singleton<ComposerService>;
public:
    static sp<ISurfaceComposer> getComposerService();
    static surface_flinger_cblk_t const volatile * getControlBlock();
};

ComposerService::ComposerService()
: Singleton<ComposerService>() {
    const String16 name("SurfaceFlinger");
    //获取SurfaceFlinger服务,即BpSurfaceComposer对象
    while (getService(name, &mComposerService) != NO_ERROR) {
        usleep(250000);
    }
    //获取shared control block
    mServerCblkMemory = mComposerService->getCblk();
    //获取shared control block 的基地址
    mServerCblk = static_cast<surface_flinger_cblk_t volatile *>(
            mServerCblkMemory->getBase());
}

这一步的主要作用:
将新的Window添加到WMS,并为这个Window对象获取一个SurfaceFlinger的代理对象BpSurfaceComposerClient。

WindowManagerService.relayoutWindow

  • WindowManagerService.relayoutWindow
    • WindowManagerService.WindowState.createSurfaceLocked
      • SurfaceComposerClient.createSurface(android_view_Surface.cpp)
        • BpSurfaceComposerClient.createSurface // 在上一步已经获得了
          • Client::createSurface(SurfaceFlinger.cpp)
            • SurfaceFlinger::createSurface
              • SurfaceFlinger.createNormalSurface
                • new Layer
                  • onFirstRef > new SurfaceTextureLayer
                    • new SurfaceTexture
                      • SurfaceFlinger::createGraphicBufferAlloc
                    • new LayerBaseClient(LayerBase.cpp)
                      • new LayerBase(LayerBase.cpp)
                  • Layer.setBuffers(Layer.cpp) // 为这个layer分配GraphicBuffers
                    • new SurfaceLayer
                      • new LayerBaseClient::Surface
                • SurfaceFlinger.addClientLayer
                  • BnSurfaceComposerClient.attachLayer
                  • addLayer_l // 将这个layer加入Z轴
                • Layer.getSurface
                  • Layer::createSurface(Layer.cpp)
                    • new BSurface // BSurface实现了ISurface接口
      • new SurfaceControl

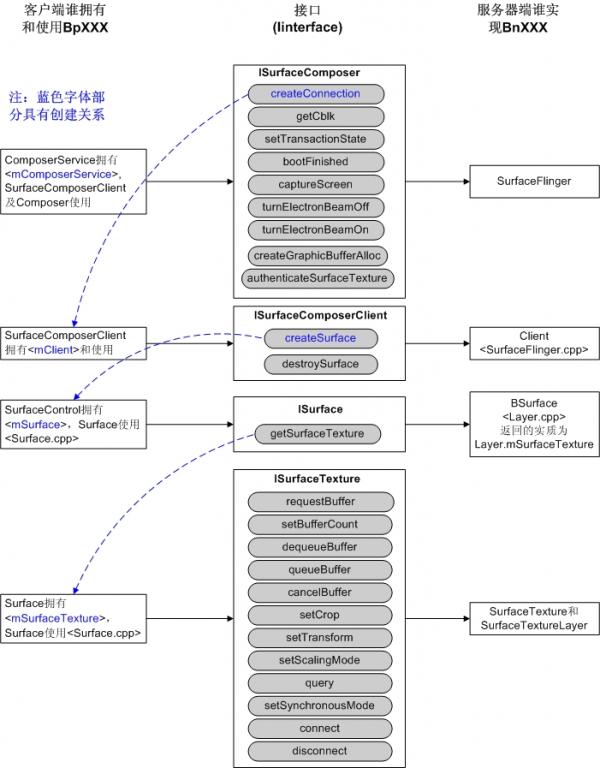
这篇文章的这张图很好的描述了SurfaceComposerClient对象内的状态:

/images/android-surface-interfaces.jpeg

Surface.lockCanvas

  • Surface.lockCanvas
    • Surface_lockCanvas(android_view_Surface.cpp)
      • getSurface
        • SurfaceControl.getSurface
          • new Surface
    • Surface.lock(Surface.cpp)
      • SurfaceTextureClient::lock
        • dequeueBuffer
        • lockBuffer
    • new SkBitmap

Gralloc

  1. Used to allocate and map graphics memory to app processes
  2. Facilitates graphics memory export via Binder IPC mechanism
  3. Provides cache synchronization points
  4. Also used for framebuffer discovery

Surface.unlockCanvasAndPost

  • Surface.lockCanvas
    • Surface_lockCanvas(android_view_Surface.cpp)
      • getSurface
        • SurfaceControl.getSurface
          • new Surface
    • Surface.lock(Surface.cpp)
      • SurfaceTextureClient::unlockAndPost
      • GraphicBuffer.unlock
      • queueBuffer

Reference

待续…

Diff Files Over SSH

| Comments

比较单个文件

ssh user@host "cat path/to/remote/file" | diff path/to/local/file -

比较目录

利用sshfs将远程目录mount到本地,然后你就可以像比较本地目录一样操作这两个目录了。 安装sshfs

sudo apt-get install sshfs

这会同时安装sshfs和fuse

加载fuse模块到内核

sudo modprobe fuse

挂载远程目录到本地的挂载点,执行比较

$ mkdir local-mount-point
$ sshfs user@host:/path/to/remote/dir local-mount-point
$ diff -r /path/to/local/dir local-mount-point

最后,umount这个目录

$ fusermount -u local-mount-point

umount的时候可能提示failed to unmount device or resource busy的错误信息,这时可以:

$ fusermount -m local-mount-point  // 查看哪些进程在使用这个挂载点
$ fusermount -k pid                // 杀掉这个进程
$ fusermount -u local-mount-point

另外,fusermount命令的setuid属性被设置了,所以运行的时候可能会有权限问题,需要把当前用户添加到fuse这个用户组中:

sudo adduser <username> fuse
sudo chown root:fuse /dev/fuse
sudo chmod +x /dev/fusermount

Reference

Ubuntu下gcc编译找不到libc.so

| Comments

前几天升级了Ubuntu系统,今天编译时出现如下错误:

$ gcc buffer.c 
/usr/bin/ld: cannot find -lc
collect2: ld returned 1 exit status

明显是ld找不到libc.so,可能时升级系统引起的。 查看/etc/ld.so.conf:

$ cat /etc/ld.so.conf
include /etc/ld.so.conf.d/*.conf
$ cat /etc/ld.so.conf.d/*.conf
/usr/lib/mesa
# Multiarch support
/lib/i486-linux-gnu
/usr/lib/i486-linux-gnu
# Multiarch support
/lib/i386-linux-gnu
/usr/lib/i386-linux-gnu
/lib/i686-linux-gnu
/usr/lib/i686-linux-gnu
/usr/lib/alsa-lib
# libc default configuration
/usr/local/lib

刷新ld conf cache:

$ sudo ldconfig

还是不能解决问题。 之后

$ locate libc.so
/lib/i386-linux-gnu/libc.so.6
/usr/lib/i386-linux-gnu/libc.so
$ sudo ln -s /usr/lib/i386-linux-gnu/libc.so /usr/lib/libc.so

再编译,成功了,ld.so.conf中已经包含了/usr/lib/i386-linux-gnu目录了,按理说应该可以找到libc.so,不知道为何要在/usr/lib下建个软链接才行。不解,留待日后再研究。


Update

编译期链接

当编译完成生成目标文件(.o)后,ld程序会对目标文件进行链接。(GCC没有调用ld进行链接,它调用一个名为collect2的程序,然后由collect2调用ld来进行链接)
默认情况下,GCC在编译阶段搜索头文件的路径为:

1. /usr/local/include/
2. /usr/include/

在链接搜索库文件的路径为:

1. /usr/local/lib/
2. /usr/lib/

通过gcc选项指定搜索路径

  • 头文件的搜索路径可以通过gcc -I选项指定。
  • 库文件的搜索路径可以通过gcc -L选项指定。

通过环境变量指定搜索路径

  • 环境变量C_INCLUDE_PATH(for c)和CPLUS_INCLUDE_PATH(for c++)可以指定头文件搜索路径
  • 环境变量LIBRARY_PATH可以指定库文件搜索路径

搜索顺序为:

  1. -I或者-L指定的路径
  2. 通过环境变量指定的路径
  3. 默认路径

参考here

运行时进行动态链接

运行一个程序时,ld.so/ld-linux.so会对程序依赖的共享库进行搜索,然后装载进内存,进行重定位,最后控制权移交给程序开始运行。ld.so搜索依赖的共享库的路径顺序为:

  1. 查找环境变量LD_LIBRARY_PATH指定的路径。然而如果这个程序的setuid/setgid为被设置,这个步骤被忽略
  2. 查找/etc/ld.so.cache中的共享库列表
  3. 查找/lib
  4. 查找/usr/lib

另外,程序本身也可以通过hard-code的方式在执行文件中通过rpath这个字段指定依赖的啥share library的路径:

readelf -d <binary_file> | grep RPATH

/etc/ld.so.conf以及LD_LIBRARY_PATH配置的路径是为runtime-linker(ld.so)用的,不是compile-time(ld)!
上述问题是一个编译期问题,所以修改更新/etc/ld.so.conf对解决问题没有帮助,而在/usr/lib下创建一个到libc.so的链接则可以让gcc找到从而正确链接。

参考 man ldd, man ld, man 8 ld.so, man dlopen, man ldconfig

Reference:

VIM Heredoc格式化问题

| Comments

在VIM下使用gg=G格式化shell代码时,如果代码中有heredoc,经过格式化后会造成代码运行失败。如下:

do
    echo "Deploying..."
    ssh $USER@$HOST <<-EOF
cd testdir
mv client client-bak-`date +%Y%m%d`
tar zxf `basename $TARGET_DEPLOY_ZIP` -C .
exit
EOF
    echo ""

格式化后会成这样:

do
    echo "Deploying..."
    ssh $USER@$HOST <<-EOF
     cd testdir
     mv client client-bak-`date +%Y%m%d`
     tar zxf `basename $TARGET_DEPLOY_ZIP` -C .
     exit
    EOF
    echo ""
done

vim对heredoc的代码进行了缩进(四个空格),这样会导致执行出错。

解决:修改vim格式化shell脚本的规则,格式化时忽略heredoc。
这个脚本保存到.vim/indent/sh.vim(摘录至此):

" Vim indent file
" Language:    Shell Script
" Maintainer:       Nikolai Weibull <[hidden email]>
" Latest Revision:  2006-04-19

if exists("b:did_indent")
  finish
endif
let b:did_indent = 1

setlocal indentexpr=GetShIndent()
setlocal indentkeys+==then,=do,=else,=elif,=esac,=fi,=fin,=fil,=done,=EOF,=END
setlocal indentkeys-=:,0#

if exists("*GetShIndent")
  finish
endif

let s:cpo_save = &cpo
set cpo&vim

function GetShIndent()
  let lnum = prevnonblank(v:lnum - 1)
  if lnum == 0
    return 0
  endif

  " Add a 'shiftwidth' after if, while, else, case, until, for, function()
  " Skip if the line also contains the closure for the above
  let ind = indent(lnum)
  let line = getline(lnum)
  if line =~ '^\s*\(if\|then\|do\|else\|elif\|case\|while\|until\|for\)\>'
        \ || line =~ '^\s*\<\k\+\>\s*()\s*{'
        \ || line =~ '^\s*{'
    if line !~ '\(esac\|fi\|done\)\>\s*$' && line !~ '}\s*$'
      let ind = ind + &sw
    endif
  endif

  if line =~ '^.*<<.*\(EOF\|END\)'
    let ind = 0
  endif
  if line =~ '^"\?\(EOF\|END\)"\?$'
    let ind = indent(search('>.*EOF', 'b'))
  endif
  " Subtract a 'shiftwidth' on a then, do, else, esac, fi, done
  " Retain the indentation level if line matches fin (for find)
  let line = getline(v:lnum)
  if (line =~ '^\s*\(then\|do\|else\|elif\|esac\|fi\|done\)\>' || line =~ '^\s*}')
        \ && line !~ '^\s*fi[ln]\>'
    let ind = ind - &sw
  endif

  return ind
endfunction

let &cpo = s:cpo_save
unlet s:cpo_save 

不过delimiter只能是EOF或者END。

VIM+Xdebug调试php

| Comments

  1. 安装Xdebug

     sudo apt-get install php5-xdebug
    
  2. 配置Xdebug 编辑/etc/php5/apache2/conf.d/xdebug.ini,加入

      xdebug.remote_enable = 1
      xdebug.remote_port = 9000
      xdebug.remote_host = localhost
    
  3. 安装vim插件DBGp 下载页面: http://www.vim.org/scripts/script.php?script_id=1929 下载后放入plugins目录中即可。

  4. 在浏览器中打开要调试的php页面,在URL后加上?XDEBUG_SESSION_START=1参数 用vim打开此文件,用:Bp 设置断点,然后安 F5 键,vi会提示 waiting for a new connection on port 9000 for 5 seconds… ,此时在5秒内刷新刚才那个页面,即可在vim中看到调试界面。 如果出现 AttributeError(“DbgProtocol instance has no attribute ‘stop’”, 则说明没有配置成功,要么是 xdebug.remote_* 没有配置好,要么是url尾部上没有加入 ?XDEBUG_SESSION_START=1 ,要么是你没有在5秒内刷新页面 .

  5. 在获取变量内容时,如果变量为 array ,那么默认只会显出 (array) ,而不会显示数组内的各元素,如果无法显示数组元素内容,那么调试会遇到很多问题,因此可以根据 debugger.vim 中的注释,自行在 .vimrc 中加上如下一行:

     let g:debuggerMaxDepth = 5
    

更多的配置,可以依次类推,都在debugger.vim中有所说明。

Reference:
http://lds2008.blogbus.com/logs/115127244.html

CSAPP读书笔记-信息的表示和处理

| Comments

寻址和字节顺序

  • 字长决定整数和指针的大小,因为虚拟地址是以这样的一个字来编码的,所以字长决定的最重要的系统参数就是虚拟地址的空间的最大大小。

  • 在存储器中存储数据的顺序分为小端存储和大端存储:
    小端存储:低字节存储在低地址,高字节存储在高地址。Intel兼容机大多采用这种规则。
    大端存储:高字节存储在低地址,高字节存储在低地址。IBM和Sun的大型机多采用这种规则。
    大多数时候,字节顺序对程序员是透明的。但是字节存储顺序在以下场合会产生问题:
    在不同类型的机器间通过网络传送二进制数据,发送方应该把数据转换成网络标准再发送,接收方应该先把数据从网络标准格式转化成内部格式。
    阅读表示整数数据的字节序列时

表示字符串

  • 使用ASCII码作为字符码在任何系统上的表示方法都相同,与字节顺序和字大小规则无关,因此文本数据比二进制数据有更强的平台独立性。由于不同的机器使用不同且不兼容的指令和编码方式,因此编译后的二进制代码在不同的机器上时不兼容的,如果要在不同的机器上运行程序,必须重新编译生成新的二进制码才能运行。

  • char类型是有符号的还是无符号的?

C语言的位运算

  • 表达式~0生成一个全1的掩码,不管机器的字大小是多少,这是一个可移植的写法。

  • C语言中的右移位运算包括逻辑右移和算术右移。逻辑右移在左端补0,算术右移在左端补最高有效位的值。C语言标准并没有规定应该使用哪种类型的右移方式。实际上,对于无符号数据,右移必须是逻辑的。而对于有符号数据,几乎所有的机器都使用算术右移。在Java中对右移有明确定义:运算符>>表示算术右移,运算符>>>表示逻辑右移。

  • 一种交换指针所指向的存储位置的方法:

    void swap(int *x, int *y) {
        *y = *x ^ *y;
        *x = *x ^ *y;
        *y = *x ^ *y;
    }
    

数据类型及转换

  • 整数数据类型的取值范围

  • 确定大小的整数类型

    由于每种数据类型在不同的机器上可能有不同的取值范围,而c语言标准只是规定了每种数据类型的最小范围,而不是确定的范围,ISO C99在stdint.h中定义了形如intN_t和uintN_t,指定了N位有符号和无符号整数。N一般取值8,16,32,64,如int32_t,可以在所有机器上无歧义的定义一个32位的整型变量。 Java中没有long long数据类型,单字节数据类型位byte,而不是char。

  • 类型转换以及有符号数和无符号数之间的转换

    当执行一个运算时,如果一个运算数是有符号的而另一个是无符号的,那么C语言会隐式的将有符号的运算数强制转换为无符号数,并假设这两个数都是非负的。
    比如在一个32位机器上计算-1<0U,-1的二进制位模式表示为FFFFFFFF,那么有符号数-1会被隐式转换为无符号数——以无符号数来解释位模式FFFFFFFF,那么就变成了计算4294967295U < 0U,而得出来的答案显然是错的。
    无符号数和有符号数之间的这种隐式转换很容易导致隐藏的bug,使用无符号数一定要谨慎。

    类型转换的时机:

    1. 显示的强制转换
    2. 当一种类型的表达式被赋值给另外一种类型的变量时,发生隐式转换。

    C语言允许不同数据类型之间的强制转换。这种转换的一般规则是:转换的数底层的存储位模式不会改变,只是改变了解释这些位的方式。
    当转换既涉及到大小变化(如int—>short)又涉及到符号改变时,会先进行大小的转换,再以有符号或者无符号的方式去解释转换后的位模式。如:

      short  sx = 0xcfc7;
      unsigned uy = sx;
      printf("uy = %u\n", uy);
    

    输出:uy = 4294954951

    转换的过程是:
    先转换大小:short—>int,进行位扩展,0xcfc7—>0xffffcfc7
    再完成有符号到无符号的转换:以无符号的方式解释0xffffcfc7,得到4294954951。

Reference

关于补码

一些有趣的C程序

| Comments

#include <stdio.h>

int n[]={0x48,0x65,0x6C,0x6C, 
0x6F,0x2C,0x20, 
0x77,0x6F,0x72, 
0x6C,0x64,0x21, 
0x0A,0x00},\*m=n;

main(n){ 
    if(putchar (\*m)!='\0') main(m++);
}

输出Hello, world!

Kindle Keyboard 资源索引

| Comments

/images/amazon_kindle_wifi_3rd_generation.jpg

越狱

下载 update-jailbreak-*.zip,并解压出对应你的机器的版本的 update_jailbreak_*_install.bin 文件,放到 Kindle 的根目录中,然后在 Kindle 的 Settings 页面中,按 Menu,选择 Update your Kindle,等待两分钟左右,即可完成越狱,并且由于已经重启了,这时 Kindle 的根目录中应该已经多出了 linkjail 这个目录了。在 Kindle 的内部文件系统中,相应的目录已经被换成了符号链接,目标就是这个 linkjail,我们可以通过修改 linkjail 中的文件来达到修改 Kindle 内部文件系统文件的目的。

中文字体优化

电子书资源